Summer nights, backyard BBQs, hiking trails—nothing ruins a good time like pesky mosquitoes and biting bugs. While store-bought bug sprays often contain harsh chemicals like DEET, you can make your own natural alternatives right at home. These DIY bug sprays are simple, effective, and made with ingredients you probably already have on hand or can easily find.
Let’s dive into two recipes: one for adults that packs a strong herbal punch, and one that’s gentle enough for the little ones 2+.
🧴 Bug Off, Y’all! – DIY Bug Spray for Adults
This blend uses essential oils known for their bug-repelling powers. It’s strong, long-lasting, and smells herbaceous and fresh—not like chemicals in a can.
Ingredients:
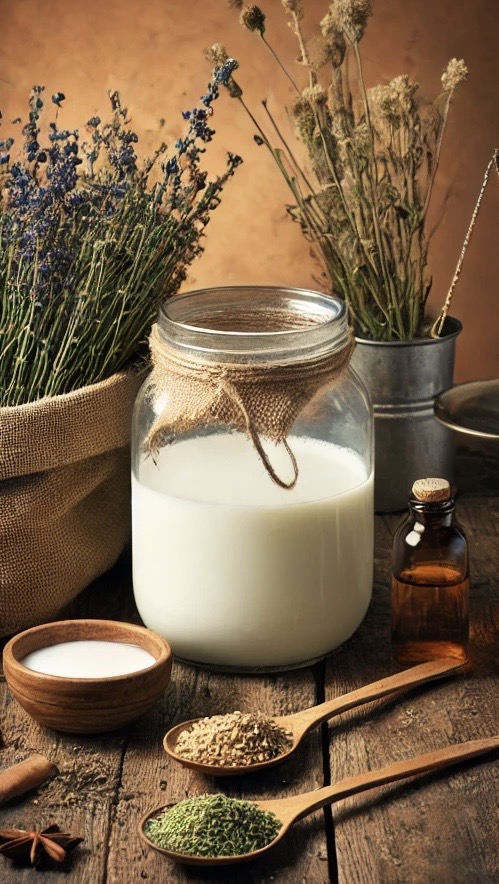
• ½ cup witch hazel (alcohol-free)
• ½ cup distilled water
• 10 drops citronella essential oil
• 10 drops patchouli essential oil
• 10 drops lavender essential oil
• 5 drops tea tree oil
• 5 drops cedarwood essential oil
Instructions:
1. Combine all ingredients in a 4 oz spray bottle (amber glass or PET plastic is best).
2. Shake well before each use.
3. Spray on exposed skin and clothing, avoiding eyes and mouth.
Upcycle Tip: If you’ve used our magnesium spray, don’t toss that bottle—give it a second life as your new bug spray bottle. It’s the perfect upcycle!
🌿 Proven Essential Oil Blends That Keep Bugs Away
If you’re looking to switch it up or use what you’ve already got in your stash, these five blends are a few more traditional herbal alternatives. Mix up one of these combos in the same base recipe (½ cup witch hazel + ½ cup water) and use about 30-40 total drops of essential oils per 4 oz spray bottle.
1. Classic Powerhouse Blend
• 10 drops citronella
• 10 drops lemon eucalyptus
• 10 drops lavender
2. Deep Woods Protection
• 10 drops cedarwood
• 10 drops patchouli
• 10 drops clove
3. Sweet & Strong
• 10 drops geranium
• 10 drops lavender
• 10 drops peppermint
4. Bright & Defensive
• 10 drops lemongrass
• 10 drops tea tree
• 10 drops lemon eucalyptus
5. Spicy & Long-Lasting
• 10 drops clove
• 10 drops cinnamon leaf
• 10 drops cedarwood
🧸 Lil’ Bug Bouncer – Kid-Safe Bug Spray
Kids’ skin is more sensitive, so this gentle version skips the stronger oils while still keeping bugs at bay.
Ingredients:
• ½ cup witch hazel (alcohol-free)
• ½ cup distilled water
• 10 drops lavender essential oil
• 8 drops geranium essential oil
• 6 drops lemon balm essential oil (or use a cooled lemon balm tea as your water base)
• 4 drops chamomile essential oil (optional but soothing!)
Instructions:
1. Add ingredients to a 4 oz spray bottle.
2. Shake well before each use.
3. Apply to clothing or skin (avoid face and hands with young kids).
Safe for kiddos 2 and up. For babies under 2, use gentle hydrosols (like lavender or chamomile) sprayed on clothes, blankets, or stroller canopies instead of direct skin application.
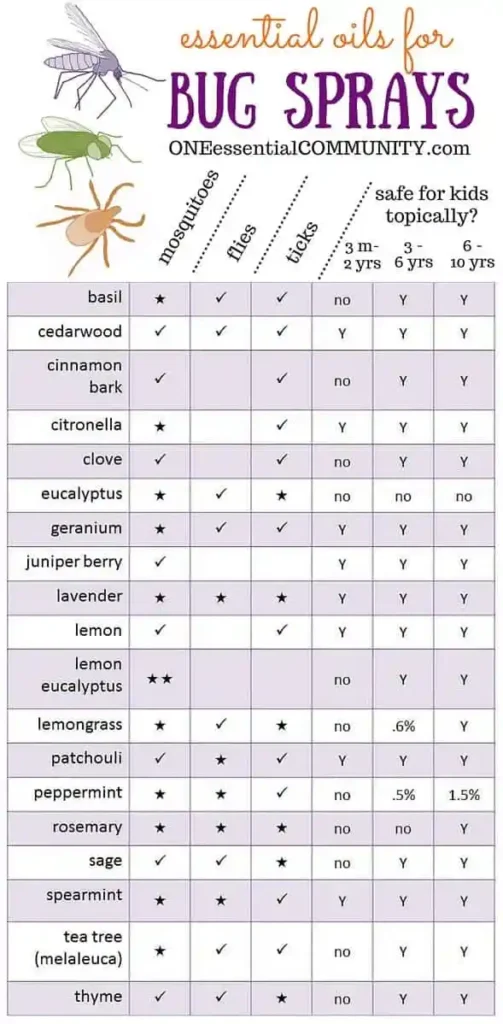
Want learn more about specific essential oils best for DIY bug spray? Check out the chart below created by https://oneessentialcommunity.com/
🌱 Why Go Natural?
Natural bug sprays are:
• Free from harsh chemicals
• Gentle on skin
• Customizable in scent and strength
• Budget-friendly and sustainable
• Easy to make at home with minimal tools
Whether you’re heading to the garden, camping in the woods, or just sipping sweet tea on the porch, these natural bug sprays help keep your skin bite-free—and smelling good while you’re at it.
✨ Final Notes:
• Always patch test any new product on a small area of skin.
• Store your spray in a cool, dark place and shake before each use.
• Essential oils are powerful—use caution around pregnant women, infants, and those with sensitivities.
Hope you enjoy!
-Smith Creek Farmstead Family
⚠️ Disclaimer:
This content is for informational and educational purposes only and is not intended as medical advice. Always consult your healthcare provider before using essential oils, especially if you are pregnant, nursing, have a medical condition, or are using this spray on young children. Every body is different, and what works for one person may not be suitable for another.
This is for informational and entertainment purposes only and should not be taken as medical advice. Products mentioned in this article have not been evaluated by the FDA. These products and information on this page are not intended to diagnose, treat, cure, or prevent any disease. This website is not a substitute for professional care. Always consult your medical doctor regarding your medical care. Never disregard professional medical advice or delay in seeking it because of something you have read on this website.